Showing posts with label Tutorial. Show all posts

Wednesday, February 29, 2012

Jewel Stars

I'm fairly new to Flickr.  I've been aware of it for awhile, but it wasn't until recently {thanks to lots of browsing while sitting on the couch, nursing} that I've really spent much time perusing!  When I first decided to start working on an actual paper piecing project, I spent a lot of time looking at projects on Flickr and  I was really drawn to this specific formation:

Source
I think part of my attraction to the piece was that the pattern is so retro and fun, but could really be stunning if the blocks were made with some soft, modern fabrics.  The blocks aren't as complicated and time consuming as my Rose Star Blocks ...


... but not quite as mindless as the hexies ...


... and they look like they'll go together faster, since they don't have quite as many connecting pieces.

These blocks appear to go by a variety names (Texas Star, Star Flower, Irregular Pentagon, Jewel Flower, Jewel Star), but I couldn't find a template for any of them anywhere, which only left me a few construction choices:
  1. I could purchase the pre-made templates from PaperPieces.com ... but I'd have to wait for them to be shipped, and even though they're fairly reasonable, I'd need a ton and have already blown my crafting budget {for the next few months} on new fabric.
  2. I could purchase the e-files for the templates from InstantPiecing.com ... but the files include a 1/4" seam allowance.  Again, since I need so many blocks, this potentially wastes
  3. I could figure out how to make my own template.
I knew that I wanted to use a 1 inch hexagon as my flower center since this works well with a 2.5" scrap of fabric - perfect for my use with my charm packs - so I went to http://incompetech.com and made my own hexagonal graph paper.  From there, using one of my quilting rulers, it was really easy to create my own template!  Here's the result ....

... and here's the resulting block!


If you're interested in making your own jewel star, please join my brand new Flickr group: Jewel Stars - English Paper Piecing and share your finished blocks with us!

Just to make life easier, here is a full-scale copy of the template:

English Paper Piecing - Jewel Star Pattern

Just print this baby out on card stock -- making sure that the printing size option in Adobe Reader is "ACTUAL SIZE." -- carefully cut it apart, and then go to town!  I'm hoping to have a tutorial posted some time in the next week, and have some other .pdf documents to share soon for mass production of the shapes.  Can't wait to see some more finished blocks!

Oh! Almost forgot - I'm linking up over at Freshly Pieced for WIP Wednesday.  So many great projects out there!

WIP Wednesday at Freshly Pieced

Friday, January 27, 2012

Leftovers!

I was thinking about yesterday's post - mainly about why I haven't sewn more clothing, and I think a big part of the reason why I don't is because there is so much wasted fabric when sewing from a clothes pattern.  Granted, it really is leftover fabric, but they're usually in odd shapes and require a little bit of extra work to get into nice, workable squares.  Once I had finished my niece's dress, though, rather than set the odd leftovers aside, I cut all of the fabric scraps into 2.5" squares - not sure why I picked that size, other than it seems to be my go-to size that works well with almost everything!

I actually scrapped anything less than 2.5" and then I played around in EQ6 to come up with a small on-point checkerboard quilt that used up as many of my leftover squares as possible, along with squares of my go-to white floral print that I always keep on hand in bulk.

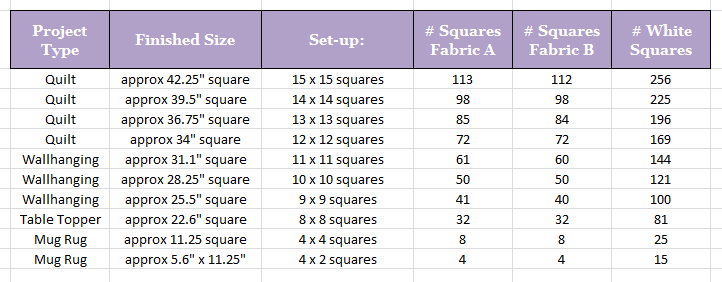
Here is the math for my WIP (12 x 12 squares) and several other basic projects, in case you're interested ...


"Fabric A" would be the blue squares below, while "Fabric B" is the pink.  If you're going for more of a scrappy look, as long as you had enough squares to equal A+B in the table above, you're set.

Here's an example of a 10 x 10 layout:


To save time, rather than cutting individual setting and corner triangles, I pieced my project in diagonal strips, and just used a whole white square at the end of each diagonal row.  Once I've sewn all the rows together, I'll just cut off the white edges (making sure to leave a 1/4" margin for binding) to square up the quilt!

Friday, January 13, 2012

Waste not, want not ...

... or how to use every last scrap of fabric while making your Full House quilt for the January Schnibbles project.

I don't know about you, but I'm one of those quilters who absolutely hates to throw any scrap of fabric away unless it's less than 1/2" wide or is damaged somehow.  I know that sometimes, especially when trying to tailor block construction to be charm-square friendly, scraps are inevitable ... so what to do with the leftovers?  And once you've finished a quilt, do you really want to go through and sew together a million little triangles left over from those flying geese blocks to actually make something, or are you much happier just saving those bits for a rainy day that might never come?

So ... why not make two projects at once?  Thus ... the "Lumber Scraps" mug rug was born out of the scraps of my Full House quilt!


When I was constructing my flying geese blocks, I drew two lines on the back of my "sky" square.  The first (in blue below) was from corner to corner and was the line I sewed along per the construction instructions.  The second line (in red below) was drawn 1/4" away from the blue line.  I stitched a seam a 1/4" away from the far side of the line.

After sewing both seams, I cut the block along the red line ....


... and then pressed the blocks open before repeating for the second side.


That way, once I was done with all of my flying geese blocks, I had 36 - 2" half square triangles already assembled!  I laid them out in a pinwheel pattern ....


... sewed the blocks into columns, and then sewed the columns together and ended up with a 9.5" mini-quilt.


After a little bit of straight-line quilting ...


... and some binding ....

... I had made myself a little mug rug!  I suppose you could also hang it on your wall as a little mini-quilt, or use it as a little place mat for when you eat your lunch at your desk ... or you could even use it as a little Barbie doll quilt!

The best part was that because I had pre-assembled the little half square triangles as I was working on my Schnibbles quilt, I was able to finish this little project in one nap-time, and I;ll be able to add 1/4 yard to my list of busted fabrics for the week!  It's a good thing too, since that might be my only bust of the week!

Happy Sewing. :)

Sunday, January 1, 2012

Poplun Tutorials

Since I took a little bit of a break from pattern writing for a few months, I found that when I sat down to finish next week's releases, I was a bit foggy on some of my quilt block formulas.  To make life a little easier, I've assembled these cheat sheets for quick reference. Enjoy!

Have any requests?  Just leave me a message and I'll do my best to oblige!!

Flying Geese Tutorial

Half Square Triangle Unit Tutorial